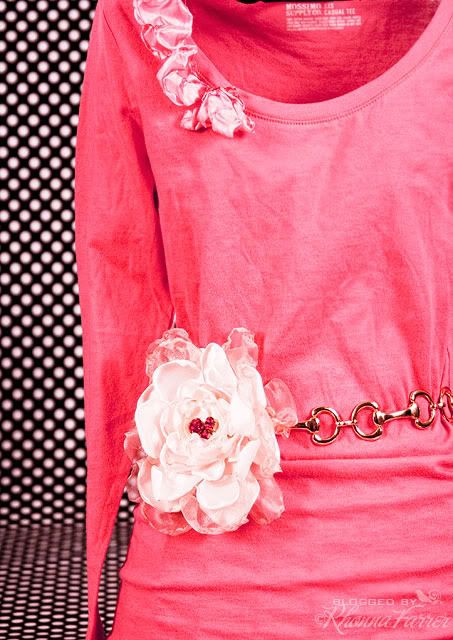
Seriously, I'm in LOVE with these flowers. You can make them any size, color, add any kind of bling or pearls/buttons/beads/findings to the center of them & they sass up ANY outfit!
Here's a little looksie at how to make these puppies.
Supplies needed:
- 1/2 yard of any kind of synthetic (like polyester) fabric. I love satin, chiffon or organza for these flowers.
- candle. tea light. lighter. whatever you've got around.
- scissors
- circle template I used on the show. found HERE.
- felt cut into a circle to back the flower
- pins, clips, hair pins, bobby pins; anything to attach your flower to something.
optional: lil' lovelies to put in the middle of your flowers.
Steps:
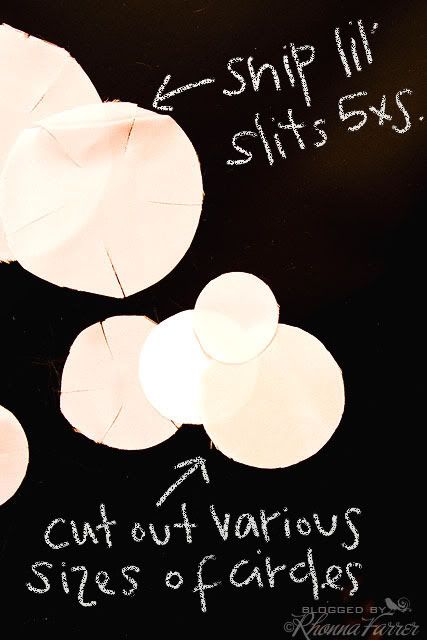
1. Print & cut out on thick cardstock the Circle Template found HERE. Cut out fabric in the various sized circles. Remember: the more layers you have, the fuller your flower.
2. Snip on the dotted line to create the petals. Note: Depending on the fabric, you may want to snip little notches off the corners of your petals. Some fabrics will be fine & will melt in a very natural looking petal. But, some fabrics don't like that extra bit o' mass there & will burn & get all wonky.
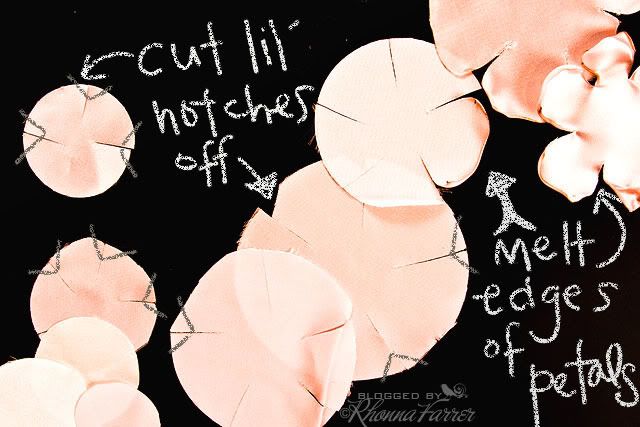
3. Fold over to expose 1 petal at a time & with tweezers, (or if you're really brave; your fingers) melt about 1 inch away from flame. NOT too close or you'll burn it! But, watch out: each fabric will melt differently. i.e. organza & chiffon melt VERY fast.
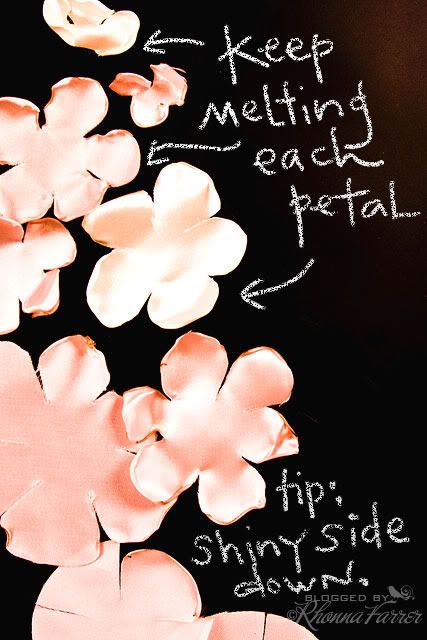
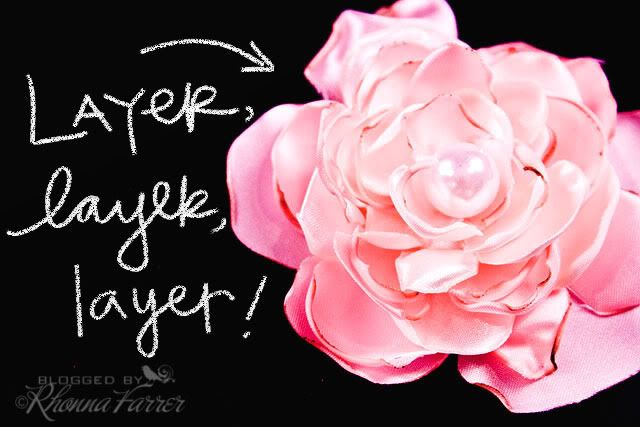
4. Layer from large to small & glue or stitch each layer to one another until you have a fabulously gorgeous flower.
**You can layer various colors or textures like organza & chiffon with the silk for a very cool effect.
5. Add the smashing *bling* to the center of you flower.
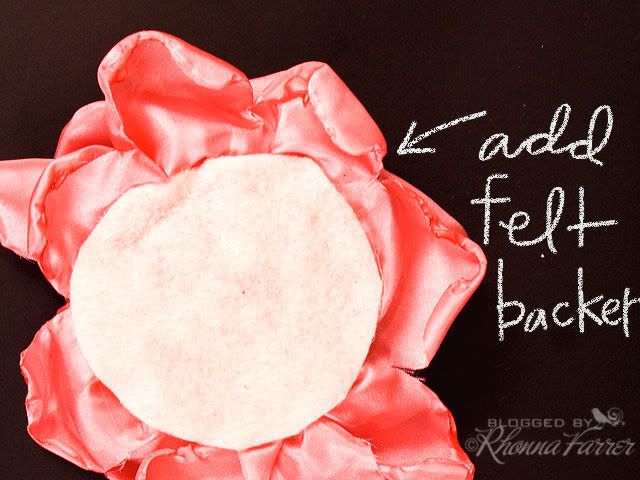
6. Cut out a felt circle & adhere to the back of your flower.
7. Add a pin, clip or any other 'attachment' for your flower.
mmmm....it's a beauty!

Dearest Rhonna,
ReplyDeleteYou make my dreams come true! Really! They may be small ones but that doesnt matter! You still do that for me.i want to give you one Humoungous(sp) hug and moooch!mmmmmwaaa. This is for the Roses tutorial. xoxEvelyn
Rhonna, thanks, thanks, thanks... feelin' the love...
ReplyDeleteI watched the video and immediately started cutting circles in old nighties...made 3 flowers with pin backs and placed them on some solid colored bead necklaces I had...wore them proudly to work with my scrubs(work at the amereican red cross)..got so many compliments..just wanted to say THANK YOU...I love your videos..you're so cool..fashionable and an amazing artist...I think I was channeling YOU whern I was wearing them..continue with the videos(loved seeing your hubby)..he did a great job!...love seeing you and heidi together as well..anyway..thanks for such an inspire rhonna! hope I can have the chance to meet you some day
ReplyDeleteOh my, I'm in love! I will definitely be making these soon!
ReplyDeleteWhat a seriously simple stunning idea - now I can't wait to create. Thank You ((HUGS))
ReplyDeleteLove these, so so cute. I made a few myself too just after watching the web show. So totally making these for a Young Women activity :)
ReplyDeleteI did the same thing as Robin, put a flower on a bead necklace and wore it all day sunday, everyone loved it, so cute! You rock!
Thanks for more info and pics I LOVE these flowers soooooo much. I enjoy learning things from you. Your my inspiration. Had a great time watching the video and we learned alot. It would rock if you had a weekly show on say Monday night and then Heidi on Wed. or whatever night worked for you. I appreciate all the work and preparation you guys put into your videos. Have a great week.
ReplyDeleteI have been busy making brooches and they look FAB.
ReplyDeleteI know what everyone is getting for Christmas now!!!
Thanks Rhonna
love love LOVE flowers right now! Especially ones I can make with stuff in my fabric stash instead of spending tons of money in a boutique! Can't wait to make these!
ReplyDeletep.s. Is there any way you'll do a giveaway? I fell in love with the turquoise and deep teal roses you pictured.
Rhonna - thanks for the instructions. I think I've made 10 flowers since last wednesday! I bought so much fabric to play around with! I ended up using a taper candle (those really long skinny ones) and letting the wax drip on my non-stick craft mat. It seemed like I had better control of where the heat was hitting the fabric and how hot I wanted it to get. Seemed to work ok!
ReplyDeletelovely!
ReplyDeleteThese flowers are just amazing, great.
ReplyDeleteOh how I LOVE these flowers and gotta love even more the girl that shares!!! THANK YOU SOOOOOOOOOOO much for all the great pics and direction, videos AND for posting the now infamous circle templates that many of us originally missed . YIPEE !!! Oh I can hardly stand it! :)
ReplyDeleteRhonna, I loved your video tutorial of how you make the beautiful flowers. I started making them and it was taking me a long time to make one flower, think I was afraid of catching myself on fire, LOL, sooooo I used my heat gun (like you use for embossing) and a pair of tweezers to hold the petals down while I was heating them, and waalaa, it works great. Just don't want to hold the heat on one place too long. You might want to give this a try, I made 4 flowers in about 15 minutes. Thanks for the instructions!!
ReplyDeleteGinger
http://glitterandroses.blogspot.com
Thanks for the great tutorial, Rhonna! I made a flower using the strip of satin and it turned out beautifully! Will be making lots of these for gifts. Thanks!
ReplyDeleteOH MY BEAUTIFLU creations.
ReplyDeleteLovely, awesome, I can't wait to make some of these... I have an idea for Mother's day now.
Thank you so much!!!
I stumbled upon your blog. These are absolutely wonderful.I have a drawer full of satin and other fabrics to use for these, thanks so much
ReplyDeleteyou are amazing, rhonna! loving all of these. thank you again for everything!!! we love you!
ReplyDeleteoh YAY! thank you THANK YOU for the template & awesome steps & more photos! LOVE these flowers & need to make some teacher appreciation and Mother's Day gifts this week!
ReplyDelete{{GIANT HUGS}}
Rhonna, thank you so much for putting the instructions up for those of us that missed last week. Since I saw your video from last week, I have been dying to make these!
ReplyDeletewow that is so gorgeous too! I'm definitely going 2 try it out. awesomeness ;)
ReplyDeleteWhat a creative mind you have! I love these flowers!
ReplyDeleteGood idea! My mom really loves flowers even in her dress. She gonna love this for sure. Thanks for sharing.
ReplyDelete-yumi-
Thanks for the great tutorial,These are absolutely wonderful I have been dying to make these! thank,s for great informative post. flowers to Pakistan
ReplyDelete