One moRe DIY Fabric Flower Tutorial
Ok...sorry this took me so long to get up. On the craft show, I showed you a way to create flowers out of a long strip of fabric OR a long strip of ribbon. Here's a little step by step on it!Supplies needed:satin poly fabric (OR satin ribbon) *Note: the longer the strip the bigger the flower.needle & thread OR sewing machinescissorshot glue gun OR Fabri-tacfelt circle for backingclip or pin for back
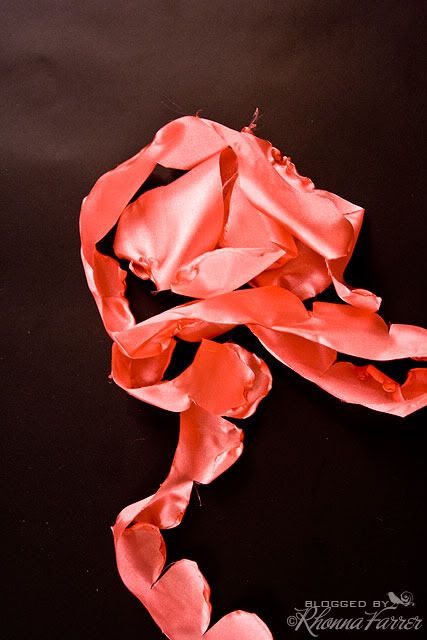
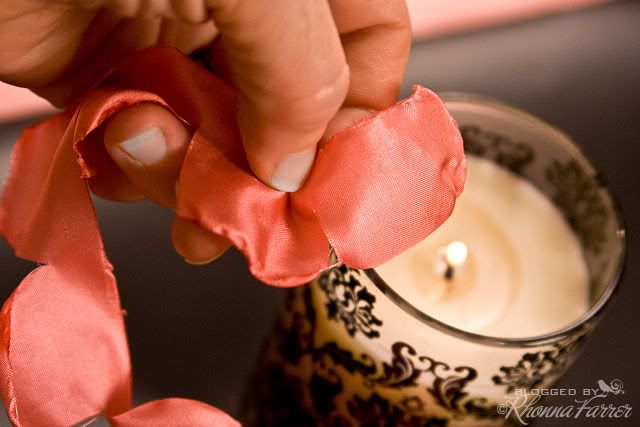
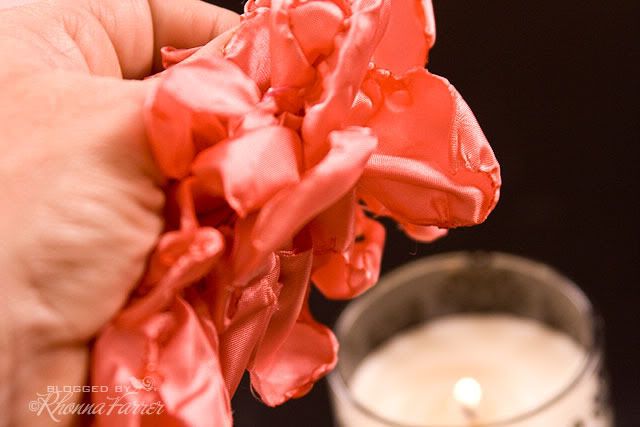
Step 1: Snip down the entire strip of fabric about 1" apart...as you get to the end, start making wider snips at about 1 1/2". (this will be the outer part of your flower.) **OPTION: You can use a strip of satin ribbon instead. This is quite fun because of the various widths AND both edges are 'finished' so you don't have to melt the straight edge. Step 2: Now, you'll create the petals by holding one section at a time over a flame. Remember: don't get too close to burn it, you just want the heat to singe it. It will naturally melt into a fabulous petal shape. **NOTE: If you've used the strip of fabric, melt the straight edge of the strip, too. Just run it along the flame to melt...easy peasy!
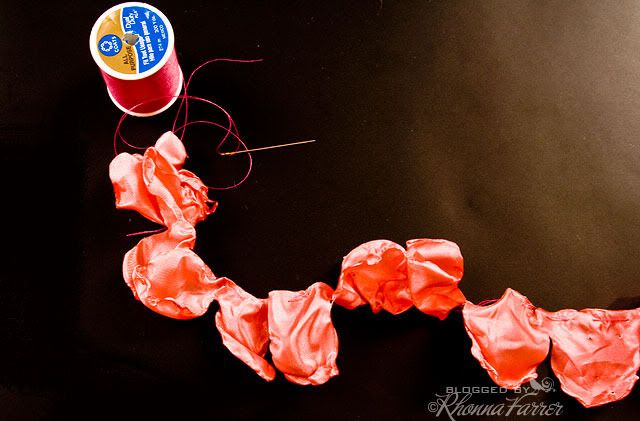
Step 3: With a needle & thread, gather until you have a lovely ruffle of petals. **on the webshow, I was saying how cute this would be on a tee shirt!
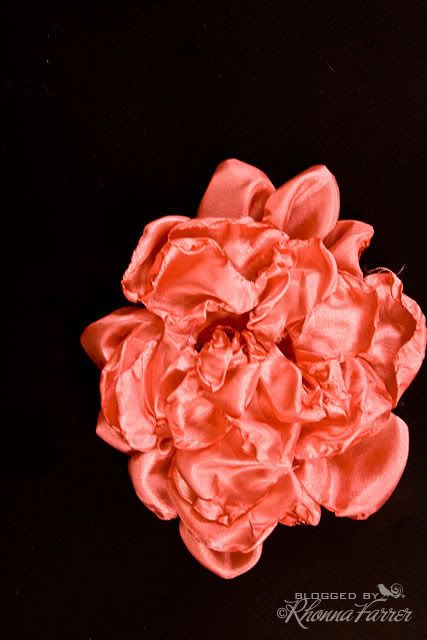
Step 4: Add a hot glue dot (or Fabric-Tac) in the center of your felt backing circle & press the smaller end of the strip in the middle. Go along the circle in a spiral as you glue & attach the rest of the flower so it ends up looking like this. **NOTE: When it's all put together, you will notice little raw edges that you may have missed. Just melt them again.
Step 5 OPTION: If you want to put the flower on a tee shirt or some other fabric, like a belt or something...you can fore go the felt backer & with the needle & thread tack the spiral together as you go along. Then, take the backside of the flower melt it together. With the tacking & the melting, you can then sew the flower to the fabric shirt, headband, belt, sleeves, whatever & it should withstand washing! FUN!
Step 6: Add jewels, pearls, or any kind of BLING to the center of your flower.Step 7: Add the clip or the pin on the backing & VOILA! You are good to go....so sassy!Now, go...have a crafty weekend & PLEASE be sure to SHOW me your flowers. I love seeing your creations!


He Rhonna These are `gorgeous`
ReplyDeleteI am sooo loving my flowers at the moment too!!!
I created some here
I made a broach,a clip some stationary hairbands and just flowers for decorating your notelets and boxes too!!!TFS
You can see mine here
http://terriebaileys.blogspot.com/2010/05/happy-monday-flowers-ideas-with.html
Have a fab weekend:)x
ooooh that looks familiar...
ReplyDeletei LOVE...
you...
it...
miss you miss you...
kiss kiss
m
I've seen many flowers and this one is GORGEOUS! I'll be linking and sending my readers your way!
ReplyDeleteThese are fabby flowers and I can't wait to have a play...just had to share a link to them from my blog so that my friends could see too.
ReplyDeleteToni :o)
these are beautiful! i just have a little question....do you cut rounded edges down the ribbon? like one inch apart? (sorry~if this sounds lame-o, but the pic kind of looked like that!) i cant wait to try! thanks so much for sharing! also, how long is your piece of ribbon and how wide? so many questions! thanks so much! xoxo terri
ReplyDeleteOh, gorgeous! I'm going to make one today!
ReplyDeleteLove it! I would love for you to link up for Flower Week @ Singing Three Little Birds. http://singingthreelittlebirds.blogspot.com/2010/05/flower-week-linky-party.html
ReplyDeletePure amazing-ness!!!!
ReplyDeleteBella idea.Complimenti.Grazie del tutorial.Ciao Mariella
ReplyDeleteThanks for teaching this. I've been making flowers like crazy. It is so super fun. You are awesome!
ReplyDeleteThanks for inspiration Rhona!!! gorgeous flowers!!
ReplyDeletex
wendela
whoa! that is cool! you never cease to amaze me!
ReplyDeletedanielle
Oh..I just commented on todays blog (not this one) about your webshow making the flowers...how amazing they were and how i'd been inspired to make some!...then scrolled down to find this blog! duh! so my comments go here really! THANKYOU!!! You're amazing. My friends and family will benefit from your expertise passed on this year...for gifts! ...thanks again.
ReplyDeleteahhh...my first try... and it looks like this...
ReplyDeletehttp://shopwitches.blogspot.com/2010/06/rosie.html
and I'm impressed! just need more practice, try another fabric, and do it more painstaking
Thank you!!! ^^
I can’t tell you how much I adore these satin flowers! Thank you so much for the fabulous tutorial!! I featured this tutorial today on my blog with a roundup of flower tutorials. Here is the link:
ReplyDeletehttp://oopsey-daisy.blogspot.com/2010/07/wednesdays-wowzers-3-dozen-plus-four.html
Thank you so much for inspiring me. Have a wonderful day!
~Alison
Thanks for teaching this. I've been making flowers like crazy. It is so super fun. You are awesome!flowers to
ReplyDeletePakistan