 Q: Diane said...
How do you flip a brush? Like your botanical swirl brushes, I would like one on one side of my document and then flip it over to go on the other side of the documents. Appreciate any help. Just downloaded 7 of your digi files and having a blast. Plan on using the "July 4" on little bags of cookies to sell at our carnival this weekend (Would that be alright?)It is for a school fundraiser. Love your work!
A: Rhonna said:#1. How cool is THAT to use the July 4 kit for bags of cookies! WTG! Yes, if you purchase a kit with a Personal License, then you can use them for any personal use that is for non-profit. This fundraiser sounds great. Of course, any time there is the opportunity for you to link or share where you got the art, we'd love it! Thanks
#2. Brushes. Yes...you can flip brushes, but it all depends on your program. The newer versions of Photoshop & Photoshop Elements allows you to go into a Brush Tab & flip, space, rotate, etc! But, older versions of the programs don't have this handy dandy palette. One HUGE reason to keep updated on your versions of software...they make life easier!
Ok, so on to the little tutorial on how to flip your brushes!
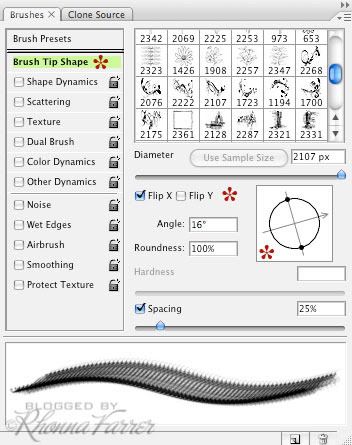
1. Go to: Window>Brushes. This will bring up a Brush Palette that looks like this:
 Note: I keep my Brush Tab docked just because I use them all the time!
2. By Default it may look different than above, so make sure you have to click on Brush Tip Shape to see this window. (Make sure all other categories are un-checked, too.)
- Flip: Notice the Flip X & Flip Y boxes. This is where you will flip your brush Axis. So helpful. & so fun! The top image of the flowers was done with the House of 3 Rhonna Botanical Swirls & I flipped the axis until I liked it. But, I also wanted to rotate the brush a bit.
- Rotate: Notice the circle with the arrow & dots. You can rotate your brush with your mouse by clickin on that arrow & simply turning/rotating it how you want it. OR you can go directly into the box at the left that says Angle & type in the degrees.
- Spacing: Notice the Spacing box. This is the place to space your brushes. So, say you want an evenly spaced dotted line. This is where you'd do it. Simply select a round brush, go into this Brush Tab & adjust the Spacing slider until you get the desired effect. **TIP: To get a straight dotted line, hold down your Shift Key while dragging your round, spaced brush.
- Diameter: This is also a great place to adjust the diameter (size) of your brush on the Diameter slider. **TIP: a short cut to make your brushes smaller is: With your brush selected, hit your [ key & to get your brushes bigger, hit your ] key.
enjoy!
R
Thanks so much for your two little *tips*. I have been trying to figure out the dotted line forever~now I know!
ReplyDeleteWOW! WOW! WOW! Thanks for the great tips!!
ReplyDeleteThanks Rhonna, I love all your designs. Thanks for answering my question.
ReplyDelete