So without further ado, let's begin our Beginner Blogger Tutorial. :)
Adding Custom Background to Blogspot.(Typepad users, I'm finding out more info on this, hang tight!)
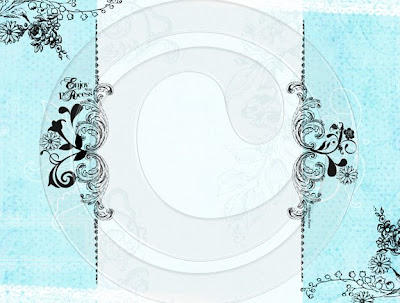
1. Download this blog template fReebie: Enjoy the pRocess.
(first 100 downloads, then it's gone!)
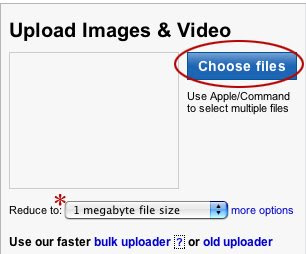
 2. You’ll need to host this on Photobucket. So, create an account, if you don’t already have one, & go to your Image Gallery.
Notice the above red star: Make sure the ‘Reduce to’ says ‘1 megabyte file size’. In order for your background to span your screen width, this MUST be selected. (IF you have problems with the size of your 1MB background, you may want to try uploading it as a 2MB background. It may help in the screen viewing.)
3. Click: Choose Files & upload your RF_EnjoythepRocessfReebie.jpg blog template.
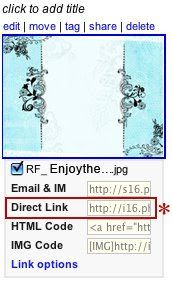
When your blog template is loaded, it will appear as an image in your account.
Click on the box & copy the Direct Link.
 4. Now, you’ll apply this to your blog, so log into your blog.
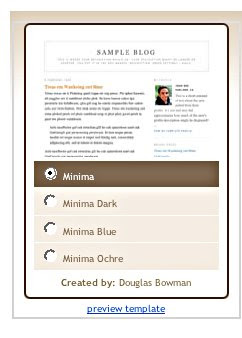
5. Go to: CUSTOMIZE>LAYOUT>PICK A NEW TEMPLATE & choose a ‘Minima Template’.
 6. Go to: EDIT HTML. Inside your box, you’ll see a bunch of jibberish. *unless you know HTML code! LOL! To they laymen, like myself, it’s jibberish. But, it’s what we need to know to change our blog background.**
so.....Scroll down until you see:
body {
background:$bgcolor;
margin:0; color:$textcolor; font:x-small Georgia Serif; font-size/* */:/**/small; font-size: /**/small; text-align: center;
and simply cut & paste this:
body {
background:$bgcolor;background-image:url(your direct link you just copied);background-position: center; background-repeat:no-repeat; background-attachment: fixed;
margin:0; color:$textcolor; font:x-small Georgia Serif; font-size/* */:/**/small; font-size: /**/small; text-align: center;
Look closely at the section in between the parentheses; this is where you paste your Photobucket Image Direct Link....INSIDE those parentheses.
7. Save your new blog fashion and & view your blog. If you have any problems, just go back into your HTML code & make sure it’s got the link, etc. **I accidentally left out one of the parenthesis & it jacked it all up! So, be careful!*
Let me know how this goes!!! I can't wait to see your new blogs! It sounded like most people knew how to add their own headers/banners. But, if you need help on that, LMK!
have a fab day * enjoy the pRocess!
R
**eta Q & A:
LynetteB asked:
Should we cut out the original "body{, then paste in the script posted here or add it to the original. It's not repeating itself the length of the blog.
Great question! Yes, paste all of the RED up above into your HTML code. Just make sure your DIRECT LINK CODE is inside those parentheses. Make sense? HTH, Tove...don't give up! You can do it! Email me or post your exact questions here, & we'll work on it together until you have it! good luck, guys!
Chris said:
...it worked perfectly except that it isn't wide enough. I assume I would need to widen it in Photobucket but that requires pro($).
This is one thing that totally depends on what size of screen you are looking on. My laptop cuts a lot of the template off since it's smaller. (i.e. the blog template I have no now only shows part of the photo! )
On my desktop, it isn't wide enough, as you said, Chris...so that is why I have chosen a white background color in my blogger account. When it doesn't stretch across the width of your screen you can just apply a coordinating or contrasting color as your background. i.e. with the Enjoy the pRocess template, you could choose a black & it would coordinate! And, then you wouldn't have to pitch in the $$ to make it work!
hth!
I love your background, and have tried to add it to my blog. I've tried a couple of times, checked everything twice, but nothing happens... Well I will not give up yet.
ReplyDeleteAnyway.
Thanks again for your inspiring blog, love it!
Thanks Rhonna! It's beautiful! And I learned something new!
ReplyDeleteThanks so much for tutorial. I am not a new blogger but I am new to blogspot. In the midst of switching from Typepad.
ReplyDeleteBut, maybe I am getting lost at "scroll down until I see....
Should we cut out the original "body{, then paste in the script posted here or add it to the original. It's not repeating itself the length of the blog.
And thanks so much again for your freebies.
Lynette
Wow, thanks Rhonna! My blog needs a new dress. It's still very much Christmas over there.
ReplyDeleteI added the background and it worked perfectly except that it isn't wide enough. I assume I would need to widen it in Photobucket but that requires pro($). thanks for the template. I really appreciate your taking the time to walk all of us through the process.
ReplyDeletethank you so much for sharing :)
ReplyDeleteI would love info on banners as well
I have had my blog for a few years now but just never seem to get my banner sized right :) so I end up with just text ... and that is TOO BORING ;)
OMG, I haven't made it for a freebie yet, BUT I have wanted to know how to do this for SOOOOO long. thank you, thank you
ReplyDeleteof course still "getting it" without a template set up might not be as easy.
i was trying to make one myself using some of your stuff i got a 2peas a while back.
thanks again,
lynn
Sorry I missed the freebie; I try to sneak a peek while a work in the future.. I am going to follow along; I downloaded a digital blog pack and this will be cool to learn..
ReplyDeleteshar
I love the freebie, thank you very much. I have tried to paste in the new code (with the direct link info from photobucket) and it doesn't work. I only end up with my blog plain white, and stretched right across the screen, with all the usual right hand side stuff, pasted underneath the post. I changed the template to minima too. I will have another attempt later.
ReplyDeleteHi Rhonna! I had to play with it for awhile to make it work. I have a widescreen monitor, so I'm not sure what it looks like on a normal monitor though. It seems that it really is too small. It was about 1/4 the size of my screen when I started trying to make it work. If anyone looks at it on my blog, please comment and let me know if it is all "wonky". Thanks!
ReplyDeleteMan! I missed out on the free download :( Oh well, I will just make one using some of your stuff I already have then try it out. I hope it works so that my background will match my banner. Which I made with some of your digital art! I love your stuff Rhonna! BTW, I see you are on FB, is that for your close friends or if I ask to become a friend will I get in?
ReplyDeleteI have subscribed to your blog, but even like this I"m NEVER on time for your downloads....:(
ReplyDeleteThat is awesome - Thank you!!!
ReplyDeleteI know a little bit about HTML, but just haven't taken the time to make a graphic with the right measurements. It would have been nice to have such a beautiful one done for me, but I missed it. I guess I'll still have to do it myself ...
Oh, I have some very similar pictures from Paris and tried fooling around, but got nothing as nice as yours. I don't have actions in Macromedia Fireworks ... do you know of any way to achieve similar results?
Works great but have to change formating of blog. But love love love it
ReplyDeletehi i love your background but i couldn't download it though.. it appears that it has reached its download limit. :-(
ReplyDeleteHi Rhonna :) thanks for the backgrounds (got them when you first offered them) and for the steps on how to add them to a Blogger account. I love it! Now that I know how to do that (thanks to you!) I'm going to try my hand at making my own. :) Keep up the wonderful work and I wish you MUCH success with Ho3.
ReplyDelete